A flawless garage floor coating starts with meticulous preparation. No matter how high-quality your epoxy or polyurea coating is, it won’t adhere properly to a poorly prepped surface. At Garage Flooring LLC, we know that proper cleaning and surface preparation are critical for a long-lasting, beautiful finish. Let’s walk through the essential steps to ensure your garage floor is ready for its transformation.
1. Clear the Space: A Blank Canvas
The first step is straightforward but crucial: completely empty your garage. Remove all vehicles, tools, storage items, and anything else that might obstruct the process. This provides a clean, unobstructed workspace and allows for a thorough inspection of the existing floor.
2. Deep Cleaning: Removing Contaminants
Concrete is porous, and over time, it absorbs oils, grease, dirt, and other contaminants. These substances can prevent the coating from bonding correctly. Here’s how to tackle this:
- Degreasing: For oil and grease stains, use a dedicated concrete degreaser. Apply it according to the manufacturer’s instructions and scrub vigorously.
- Thorough Cleaning: After degreasing or etching, thoroughly clean the floor with a strong detergent and water. A power washer can be highly effective for this step. Rinse the floor multiple times to remove all residue.
3. Repairing Imperfections: A Smooth Foundation
Inspect the floor for cracks, holes, or uneven areas. Imperfections that are big enough to feel with your fingertip will have a chance of showing through the coating, so they must be addressed:
- Crack Repair: Use a 2-part epoxy based crack filler or patch kit to repair cracks. Follow the product instructions for application and curing time. If you plan on Acid Etching for Step 4, fill the cracks after you have acid etched the surface.
- Joint Repair (optional): If you would like to hide the outline of your expansion joints through the coating, use a 2-part epoxy based joint filler for filling joints. If you plan on Acid Etching for Step 4, fill the joints after you have acid etched the surface.
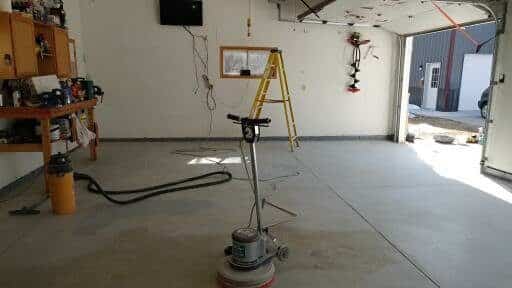
- Grinding (If Necessary): For extremely uneven floors or to remove existing coatings, paints, or sealers, grinding may be necessary. A concrete grinder will smooth the surface and remove any loose concrete.
4. Surface Profiling: Ensuring Adhesion
Concrete surfaces need a certain level of roughness, known as a “profile,” for coatings to adhere properly. This can be achieved through:
- Diamond Grinding: This is the most effective method for creating a consistent profile. It removes a thin layer of concrete, creating a slightly rough surface.
- Acid Etching (As Mentioned Before): Acid etching also creates a profile, but it’s less precise than grinding. If your floor has a previous coating, paint, or sealer applied to it, acid etching will not work and you will have to grind the floor to prepare it.
5. Final Cleaning and Dust Removal: The Finishing Touch
After profiling, the floor will have a layer of dust and debris. Thoroughly sweep or vacuum the floor to remove all particles. A hose or pressure washer can also be used to remove any remaining dust, however the floor must be completely dry before you can start applying your coating.
6. Moisture Testing: Preventing Future Issues
Moisture trapped in the concrete can cause the coating to peel or bubble. Conduct a moisture test to ensure the floor is dry enough for coating. There are several methods, including using a calcium chloride test kit or a simple plastic sheet test.
7. Test Your Prep
To make sure that your floor is prepped properly, you need to test the porosity. To do this, spray the floor in several areas with 1 spray from a spray bottle of water. Make sure that the water begins to soak into the floor right away. If the water is beading up on top or taking a long time to soak in, that area could have issues bonding with the coating and will likely need either more prep or more stain removal.
Ready for Coating:
By following these steps, you’ll create a perfectly prepped garage floor that will ensure a strong, long-lasting bond with your chosen coating. At Garage Flooring LLC, we’re here to guide you through the process and provide professional installation services. Contact us today to discuss your garage flooring project.


