You’ve decided on a durable epoxy coating for your garage floor, a fantastic choice for protection and longevity. But what if you want to elevate that sleek, solid color into something truly unique, visually stunning, and even more functional? Enter decorative flakes! These tiny, colorful vinyl chips are broadcast into wet coatings, transforming an ordinary floor into a vibrant, multi-dimensional surface that’s both beautiful and practical.
At Garage Flooring LLC, we know that decorative flakes are a game-changer for garage aesthetics. Let’s dive into what they are, why they’re so popular, and how to use them to create a personalized look for your garage.
What Are Decorative Flakes?
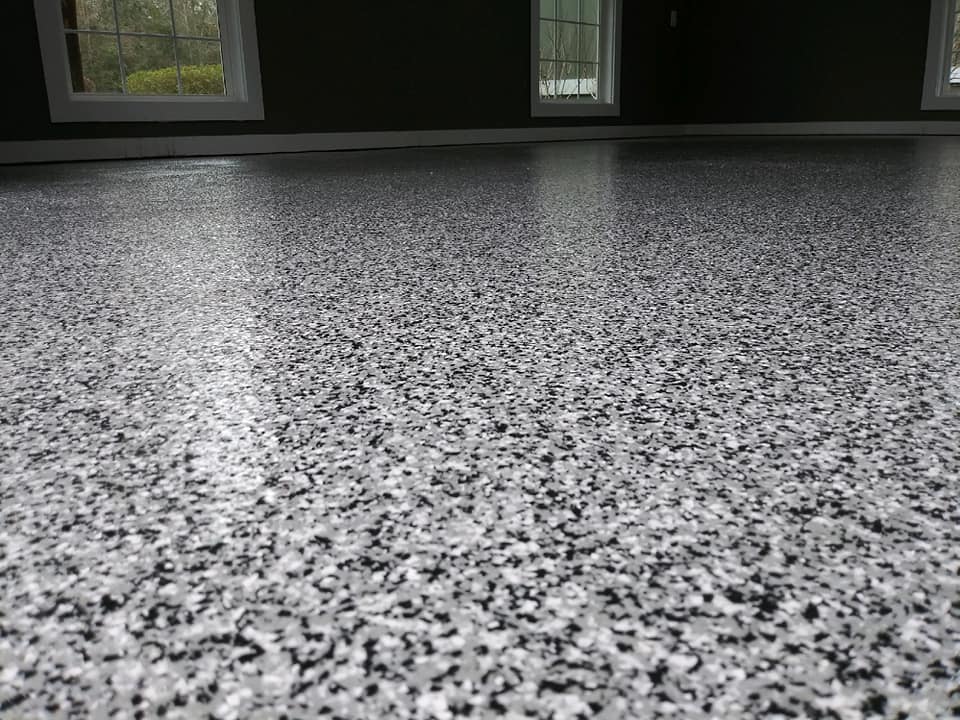
Decorative flakes (also known as paint chips, color flakes, or vinyl chips) are small, multi-colored vinyl fragments that are randomly dispersed into a wet epoxy or polyurea base coat. Once the base coat cures, a clear topcoat is applied over the flakes, sealing them in and creating a smooth, durable, and highly attractive finish. They come in a vast array of colors and various sizes.
Why Add Decorative Flakes to Your Garage Floor?
Adding flakes offers a multitude of benefits beyond just aesthetics:
- Enhanced Aesthetics: This is the most obvious benefit. Flakes create a unique, granite-like or terrazzo-like appearance that adds depth, texture, and visual interest to your floor, moving it far beyond a simple solid color.
- Hides Imperfections: The multi-tonal, speckled pattern of flakes is incredibly effective at camouflaging minor imperfections in the concrete below (like small divots or repaired cracks) and hiding dust, dirt, and light debris between cleanings.
- Improved Traction: The flakes, once sealed in, create a subtly textured surface that improves the floor’s slip resistance, enhancing safety, especially when wet.
- Increased Durability: While the base coat provides the primary protection, the flakes add another layer of material, contributing to the overall thickness and abrasion resistance of the system.
- Customization: With countless color combinations and sizes, you can create a floor that perfectly matches your home’s style, a favorite sports team’s colors, or a specific automotive theme.
Understanding Flake Size: The Impact on Your Look
Flakes are typically categorized by their size, and this choice dramatically affects the final appearance:
- Small (1/16″ or 1/8″): These create a tighter, denser, more uniform “salt and pepper” or fine granite look. They are excellent for hiding imperfections and providing subtle texture. Best for a very clean, refined finish.
- Medium (1/4″): The most common and popular size, this is the standard flake size in our coating kits. This offers a balanced look, clearly showing individual flakes while still providing good coverage and hiding power. It’s a versatile choice that works well in most garages.
- Large (1/2″ or 1″): These create a more dramatic, bold, and pronounced “terrazzo” effect. Individual flakes are very noticeable, offering a distinctive style. They are best suited for larger areas where their impact can be fully appreciated.
Broadcast Density: Full vs. Partial
How many flakes you apply also changes the appearance:
- Full Broadcast: This involves throwing flakes until the entire wet base coat is fully covered, and no more flakes can stick.
- Pros: Maximum hiding of imperfections, superior slip resistance, highest thickness. Creates a very rich, deep, and consistent look.
- Cons: Uses more flake material and thinner coatings like Polyurea will require an additional clear coat.
- Partial Broadcast: This involves applying flakes at a lighter density, allowing more of the base coat color to show through.
- Pros: Uses less flake material, allows the base color to be a more prominent part of the design.
- Cons: Offers less hiding of imperfections, less traction, and may look less uniform if not applied very evenly.
Color Choices & Combinations: Your Personal Palette
This is where the fun truly begins! Flakes come in single colors, but most common and attractive are pre-blended mixes.
- Classic Blends: Greys, blacks, and whites (e.g., B-411, B-602) are timeless and versatile, matching almost any home style.
- Earthy Tones: Blends incorporating browns, tans, and creams create a warmer, more inviting look.
- Bold Accents: Incorporate a small percentage of a vibrant color (e.g., red, blue, orange) into a neutral blend for a pop of personality.
- Matching: Consider complementing your base coating color as well as your home’s exterior trim, interior decor, or even your favorite sports team’s colors.
The Application Process (Simplified):
While this is a style guide, a basic understanding of application helps:
- Prep is Paramount: The concrete must be meticulously cleaned, repaired, and profiled (etched or ground) for proper adhesion of the base coat.
- Base Coat Application: Apply your chosen epoxy coating or polyurea coating base coat evenly to a manageable section of the floor.
- Flake Broadcast: While the base coat is still wet, broadcast the flakes by hand, tossing them up into the air to allow them to fall evenly onto the wet surface.
- Clear Topcoat: Once the base coat with flakes has cured, sweep/vacuum any loose, unadhered flakes and break down any that are sticking up vertically. Then, apply a durable clear topcoat to seal the flakes in, provide gloss, and add another layer of protection.
Tips for a Flawless Flake Finish:
- Practice Throwing: If you’re new to broadcasting flake, practice throwing a handful of flakes onto a small piece of cardboard or scrap paper to get a feel for even distribution.
- Work in Sections: Don’t mix too much base coat at once. Work in manageable sections (e.g., 5×10 ft squares) within the coating’s pot life.
- Broadcast the Flake in Time: For most coatings, you want to get the flake thrown onto the wet base coat within about 15 minutes of rolling the base coat out in order to ensure proper adhesion.
Adding decorative flakes to your epoxy coating or polyurea coating is a fantastic way to elevate your garage floor from merely functional to truly spectacular. It’s a design choice that offers both visual appeal and practical benefits, creating a customized space that reflects your unique style.
Ready to add that extra flair to your garage floor?


